Server in Your Wardrobe: Password Protection
I have a small server at home. I'll be sharing interesting ideas how I use or configure it from time to time. In this blogpost I'd like to share how I protect some of its web panels with passwords.
There are 3 kinds of web panels I have:
-
the ones that have fully featured auth, e.g. my RSS reader tt-rss
-
the ones that only have HTTP Basic auth that cannot be turned off, e.g. Resilio Sync (ex- BitTorrent Sync)
-
the ones that have optional HTTP Basic auth, e.g. Transmission
I want these web panels to be available from the Internet. I want all of them to have password protection.
But the web panels with HTTP Basic auth that are used by all the family members (e.g. Resilio Sync or Transmission) need to be available without a password in my home network:
-
I don't want my family members to remember credentials
-
One needs to re-enter HTTP Basic credentials each time the browser is restarted
-
When I use any of those servers from a new device (e.g. a phone, a tablet, etc.) that's already on my local network, I don't want to enter credentials
It goes without saying that we need to keep HTTP Basic auth for the Internet. Also the services with fully featured auth are usually not shared between family members, so we can use them as is both from the local network and from the Internet.
Domain names
I have a static IP, so the address of my router never changes. I'll be
referring to my static IP as <GLOBAL_STATIC_IP> below. That means
that I can connect to <GLOBAL_STATIC_IP> from the Internet and that
will hit the router at my home.
Since my external IP is static, I can add a simple DNS record so I
don't need to remember my static IP. If I didn't have a static IP, I
could use DynDNS or similar solutions. I'll be using domain name
home.example.com in this blog post.
From my previous experience I found that using one domain address for all the web panels is not very convenient:
-
web panels don't usually support a custom path prefix
-
so one needs to have complex rewrite rules (and these rules become even more tricky with redirects)
So I prefer using a separate DNS name for each web panel, e.g.:
r.home.example.comfor tt-rsss.home.example.comfor Resilio Synct.home.example.comfor Transmission
Each of the subdomains above will point to the same
<GLOBAL_STATIC_IP>. The solution with subdomains also plays very
nice with autocomplete in browsers.
HTTP vs HTTPS
It's so easy to get an HTTPS ceritficate using Let's Ecnrypt. As long as it's not secure to pass credentials over HTTP, I'll be only using HTTP to redirect to HTTPS and for Let's Encrypt challenges.
I'll show a server section example for Nginx:
    server {
        listen       80;
        server_name  *.hq.garage22.net;

        # ACME challenge
        location ^~ /.well-known {
            allow all;
            alias /var/lib/letsencrypt/.well-known/;
            default_type "text/plain";
            try_files $uri =404;
        }

        location / {
            return 301 https://$host$request_uri;
        }
    }
HTTP Basic auth
As I've mentioned earlier I don't want web panels to require HTTP Basic auth for requests coming from my local network.
Nginx plays the main role here. I define two server sections for
each web panel like this:
- one at port 443 --- without HTTP Basic auth
- another at port 444 --- with HTTP Basic auth
We need some kind of port forwarding at the router side (which will be covered below). The idea is that the requests from the local network should go to port 443 (which is the default port for HTTPS), while the requests from the Internet get redirected to port 444 by the router.
Basic auth at Nginx side
If HTTP Basic auth is optional (like in Transmission), I'd prefer to disable it at web panel side and enable at Nginx side with module ngx_http_auth_basic_module.
I do so to have a single passwd file for many services.
Please see auth_basic* below:
    server {
        listen 443 ssl http2;

        server_name t.hq.garage22.net;

        location / {
            # some options omitted
            proxy_pass http://127.0.0.1:9091;
        }
    }

    server {
        listen 444 ssl http2;

        server_name t.hq.garage22.net;

        auth_basic "Restricted";
        auth_basic_user_file /etc/nginx/htpasswd;

        location / {
            # some options omitted
            proxy_pass http://127.0.0.1:9091;
        }
    }
Basic auth at the application side
If HTTP Basic auth cannot be disabled at web panel side (like in
Resilio Sync case), we can add header Authorization with the correct
credentials at Nginx side for port 443. The only downside is that we
will store credentials in base64 (which is almost plain text) in Nginx
config.
Imagine that you are going to use credentials username:password. You
need to encode them with base64 first:
$ echo "username:password" | base64
dXNlcm5hbWU6cGFzc3dvcmQK
Nginx config will look like this then:
    server {
        listen 443 ssl http2;

        server_name s.hq.garage22.net;

        location / {
            # some options omitted
            proxy_pass http://127.0.0.1:8888;
            proxy_set_header Authorization "Basic dXNlcm5hbWU6cGFzc3dvcmQK";
        }
    }

    server {
        listen 444 ssl http2;

        server_name s.hq.garage22.net;

        location / {
            # some options omitted
            proxy_pass http://127.0.0.1:8888;
        }
    }
Port forwarding
Port forwarding should be supported by your router. The idea is that
each TCP connection to <GLOBAL_STATIC_IP>:80 gets redirected to
<LOCAL_SERVER_IP>:80, and each connection to
<GLOBAL_STATIC_IP>:443 gets redirected to <LOCAL_SERVER_IP>:444:
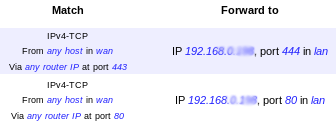
But how does one use different ports for connections from local network and from the Internet?
Approach 1: Override DNS records at router side
This approach should work fine with the majority of SOHO routers. If
you get IP addresses for the devices in your local network, it usually
means you are using your router as a DNS server. One can override
domain names *.home.example.com at router side, so they point to
<LOCAL_SERVER_IP>. That will mean that requests from browsers on
local network won't use the port forwarding rules and will be
connecting <LOCAL_SERVER_IP>:443 directly.
I used this approach with my previous router - it was a TP-Link with
OpenWrt. The only problem I had was that I couldn't use local
server IP on my corporate VPN (I had to use other DNS server in that
case, so *.home.example.com still resolved into
GLOBAL_STATIC_IP). So that meant I was asked for HTTP Basic auth
when I was on VPN even if I was at home.
Approach 2: Complex routing rules
I've switched to a MikroTik hAP ac router with RouterOS recently. RouterOS doesn't have that easy UI to configure port forwarding, so I had to learn how to route traffic properly. During that process I figured out how to translate addresses without using a custom DNS.
All the domain names will still be resolved to <GLOBAL_STATIC_IP>,
but your router can redirect requests with this destination to
<LOCAL_SERVER_IP (see dst-nat rules). The trick here was that I
needed to specify NAT rules for requests like these - otherwise the
responses will be sent from the server to the clients directly, but
the local server address will be unexpected for the clients (see
masquerade rules).
This is the configuration I use:
> /ip firewall nat print

 0    ;;; defconf: masquerade
      chain=srcnat action=masquerade out-interface=<WAN_INTERFACE_NAME> log=no log-prefix=""

 1    chain=dstnat action=dst-nat to-addresses=<LOCAL_SERVER_IP> to-ports=444 protocol=tcp dst-address=<GLOBAL_STATIC_IP> in-interface=<WAN_INTERFACE_NAME> dst-port=443 log=no log-prefix=""

 2    chain=dstnat action=dst-nat to-addresses=<LOCAL_SERVER_IP> to-ports=443 protocol=tcp dst-address=<GLOBAL_STATIC_IP> in-interface=!<WAN_INTERFACE_NAME> dst-port=443 log=no log-prefix=""

 3    chain=srcnat action=masquerade protocol=tcp src-address=192.168.0.0/24 dst-address=<LOCAL_SERVER_IP> dst-port=443 log=no log-prefix=""

 4    chain=dstnat action=dst-nat to-addresses=<LOCAL_SERVER_IP> to-ports=80 protocol=tcp dst-address=<GLOBAL_STATIC_IP> dst-port=80 log=no log-prefix=""

 5    chain=srcnat action=masquerade protocol=tcp src-address=192.168.0.0/24 dst-address=<LOCAL_SERVER_IP> dst-port=80 log=no log-prefix=""
Conclusion
I really enjoy the configuration I use these days: it's very simple and convenient.
What I really like is the separation of concerns:
-
All the details about the networking are configured at router.
-
The configuration of Nginx is straight-forward and simple with separate HTTPS ports for the requests from the local network and from the Internet.